A trailer axles primary purpose in life is to support and align the stubs, which in turn keeps the hubs and wheels (and your trailer) running straight and true.
Trailer axles come in all manner of shapes and designs and unless the trailer is mass produced or using independent or torsion style suspension/axles, then they are normally always custom built to suit the trailer and its end use.
From the basic straight beam axle, which accounts for the majority of utility trailers, stepped/overlay axles, dropped and gull wing axles, through to torsion style suspension/axles, there is a type of axle to suit almost any trailer.
Axle design and setup can dramatically affect the tow height, the deck height, the trailer stability when fully loaded and the way the trailer tracks behind the tow vehicle.
Getting the axle design right - unless professionally designed - can in most cases be a bit of hit and miss, with either a poorly underbuilt axle or a heavy, overbuilt axle that is much stronger and heavier than required being fitted.
Straight beam axles are commonly machined from one piece solid square or round bar and although heavier than hollow section axles, they are inherently stronger and less likely to suffer from stress fatigue. One piece machined axles are normally beyond the realm of the home trailer fabricator and need to be professionally sourced or machined.
Welded axles, on the other hand, can be made in the home workshop as long as you are a competent and experienced welder, have a good powerful welding machine, and can take the time to setup and align the stub axles with care and precision. If you have minimal or limited welding experience, you should seriously consider getting experienced welder or trailer manufacturer to weld your axle for you.
One of the drawbacks of welded axles is their strength can be easily undone by poor, under or over welding and the introduction of stresses through both how the axle is designed and how it is welded.
Wherever a weld is used to join metal, inherent stresses are introduced particularly where the weld has not penetrated the base metals sufficiently. If the weld is undercut along its edges, the chance of stress fractures are greatly increased and together with the lack of weld material, axle failure is imminent. Too much heat can also cause the steels crystalline makeup to become weak and brittle, again promoting early axle failure.
Getting the axle design and the welding just right will greatly improve the axles chance of fulfilling a long life under your trailer and prevent any unfortunate incident or accident. If you are in any doubt of your welding capabilities, leave the axle building to the professionals.
The axles shown on this page are intended to be used with leaf spring suspension but can be used in conjunction with coil springs, air bags and shock absorbers or dampeners.
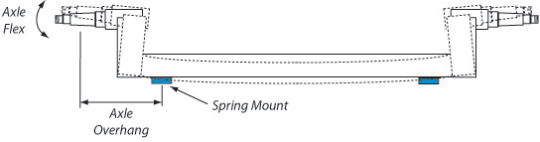
Axle Flex
A common fault with homemade axle building is having too large an overhang between the spring mounting and the hub face. As this length increases, more loaded stress is placed on the axle and the effective load rating of the axle is reduced.
This repeated flexing of the axle under load (cycling) can create microscopic cracks within the grain structure of the axle material.
Over time microscopic cracks can get larger and eventually reach a critical size, where the axle may suddenly fracture and ultimately fail potentially causing all manner of mayhem.
The shorter the axle overhang the stronger the axle will be - an added advantage is there will be less wear and tear on tyres and bearings, and reduced stress on the suspension and chassis.
Axles with minimal overhang will still flex, although not to the level that excessively overhung axles will produce.
Camber (a vertical upward kink/bend in the axle centre) can be incorporated into the axle to offset axle flex when the trailer is fully loaded.
The amount of camber is around 0.5 to 1.5 degrees of angle to the horizontal and under normal circumstances, with well designed axles and correct trailer loading, unnecessary. If you are running a fully loaded trailer constantly with minimal back clearance between the chassis/sides and tyres (20mm or less) then a cambered axle might be advantageous.
If you have an existing trailer with tyres wearing rapidly on the inner tread (closest to the chassis), experiencing scuffing on the tyres inside sidewalls or are regularly replacing wheel bearings, you may have axles with excessive overhang or have axles underrated for the loads you are transporting.
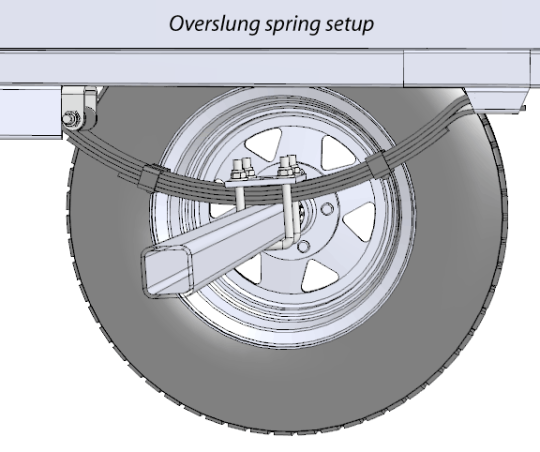
Overslung or Underslung?
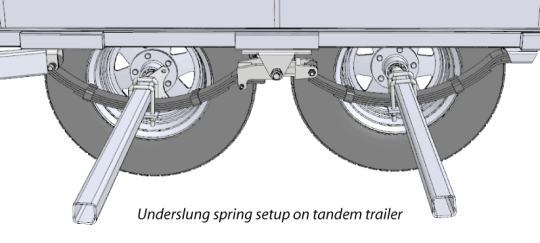
The axle position in relation to the spring needs to be considered before building. The options are “overslung”, where the spring is mounted over the axle, or “underslung” where the spring is mounted under the axle.
On a single axle trailer with standard eye/slipper springs, “overslung” is a common setup as the clearance between the top face of the spring and underside of the chassis is limited and the axle would bang against the chassis under load if mounted underslung.
There is normally sufficient clearance to mount the axle underslung on a trailer using eye/eye style springs and on tandem trailers where an oscillating/rocker load sharing system is used to compensate for the additional depth of the rocker unit.
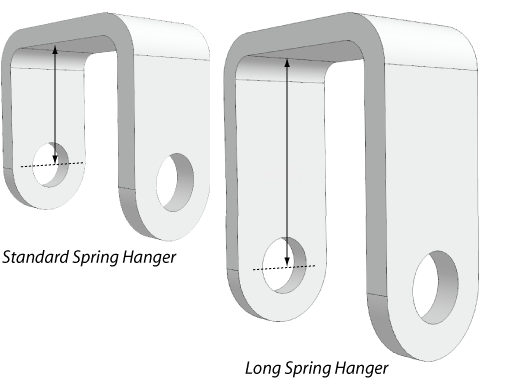
Note – if it is necessary to use an underslung axle on eye/slipper springs and clearance is an issue, source a spring hanger “U” bracket with a deeper “U” section.
There is no advantage to either system in regards to trailer strength or ride, but does affect the height of the chassis/drawbar above the road and depending on the load can aid or hinder trailer stability.
As with stepped and dropped axles, which is discussed below, a lowered deck height (underslung) can be an advantage to trailer load stability especially if the load has a high centre of gravity (top heavy) or where access to the trailer deck for loading/unloading requires a lower deck.
Too low a deck can be a hindrance and parts of the chassis can drag on the road particularly if travelling over undulating ground, going up or down driveways and over kerbs.
If you are going for an underslung setup, check there is sufficient clearance between the top of the axle and the underside of the chassis, and be aware that any change of axle height will alter the coupling height and the deck angle.
If modifying an existing trailer axle setup, coupling height will need to be adjusted to ensure a level deck when hooked up to the tow vehicle.
The difference in deck height between an overslung and underslung setup using straight beam axles is normally the depth of the axle and spring packer plus the full thickness of the spring.
Using a 50 x 50 SHS axle with a 10mm spring packer and a 5 leaf spring with 6mm thick leaves, the difference in deck height would be 50+10 + (5x6) = 90mm.
Axles need to be manufactured to both enhance the stub axle in strength and stability as well as provide a factor of safety over and above the load rating of the axle as a whole. Axles take a huge amount of abuse from both the trailers loaded weight pressing down as well as all the knocks and bumps coming up from the road. Any weakness within the axle, can cause microscopic fatigue cracks leading to eventual failure of the axle.
Measuring axle length
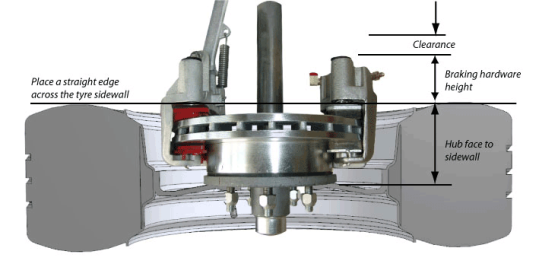
Before measuring up your axle, it pays to dry fit all the components to the stub axles. In a clean, dust free area, mount the bearings, hubs and any braking hardware you are using.
Place the assembled unit inside the wheel and rim you are using, and place a straight edge across the tyre sidewall. Measure up from the sidewall edge to the highest part of the braking hardware and add at least 20mm (minimum) to this. Remove the hub unit and measure down from the sidewall edge of the straight edge to the hubface mounting surface of the rim.
Add the measurements together, multiply x2 for both sides of the trailer and add the overall chassis width. This is the hub face to hub face measurement for your axle.
If you are using dropper extensions as below, the room these take up over and above the braking components will need to taken into consideration.
Hydraulic disc brakes inherently take up more internal space between the wheel and the trailer chassis and in most cases when the brake pads wear down, the caliper unit will move closer to the chassis.
Hydraulic and electric drum brakes take up less valuable space, but consideration needs to be given for access to the manual adjuster, any bleed nipples, park brake levers and allowing space for the cables and hoses to move and flex.
For straight beam axles, the spring centre measurement is also required before making your axle.
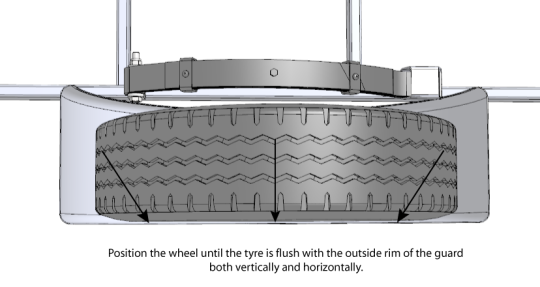
If you want to measure the axle directly off your chassis you need to clamp the guard approximately around the area where it is to go. If you are unable to clamp the guard or if the clamps will not hold, tack weld the guard in position.
Position your tyre and rim inside the guard and line up the tyre sidewall flush with the outside rim of the guard, both vertically and horizontally. If you are pushed for room within the guard, you can move the tyre out so that the start edge of the tyre tread is flush with the guard.
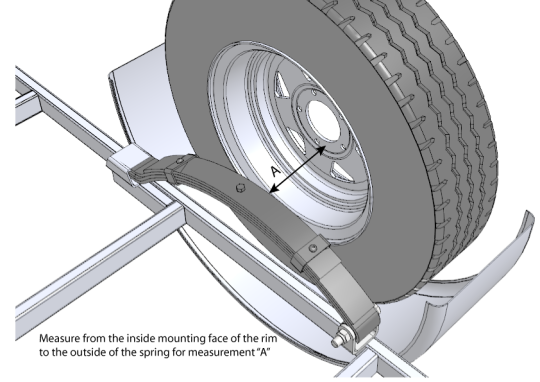
Once the tyre is in position, measure from the inside hub mounting surface of the rim, to the outside edge of the spring. If your springs are set up correctly this will be the same measurement as the outside edge of the chassis. We'll call this measurement "A".
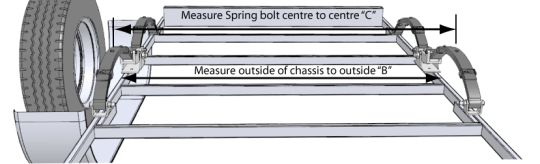
Measure your chassis width across the central part of your chassis for measurement "B". The Hub to Hub face measurements will be measurement "A" x2 (doubled) added to measurement "B".
Measuring between the spring centre bolt centres will give you the spring centres. Another way to get this is to measure your chassis width "B" and subtract the width of one spring.
These measurements should be all that is needed to get the axle building started. If you are going for a different style axle (ie, stepped or dropped axle) then further measurements will be required.