Hubs and Stubs
Hubs and stubs come in a huge range of sizes, types and styles ranging from simple straight shaft axles suitable for very lightweight trailers to large taper roller bearing setups for heavy duty operations.
Just looking through a hub and stub catalogue and you will see there is quite a selection on offer and it pays to do your homework especially if you are considering upgrading or fitting brakes at a later date.
Most suppliers will be able to match the right hub and stub setup for your trailer requirements or be able to recommend what to get and where to get it.
When considering hub and stub sizing it is important that you look at all your components for example - if I have a single axle trailer, you need to consider your tyre load rating, your spring capacity and whether you require brakes or plan to fit brakes in the future.
Straight shaft axle for Integral Bearing Wheels
The most basic of axles is the straight shaft axle with a set of deep groove ball bearings which are retained within the wheel rim. The rim rests up against a shoulder on the shaft and the whole unit is locked into place with a castle nut and split pin.
Depending on the tyre rating, this axle is good for up to 500kg load capacity and is considered light 
Due to the bearings being fully sealed it is a good option for a small dinghy or kayak trailer where the distance between home and the water is short.
Taper roller bearing hubs and stubs
This is the standard for non-braking hubs with a rating between 1000kg to 2000kg depending on stub/bearing and stud size. It operates on taper roller bearings opposed on a shouldered shaft and normally has a larger inboard bearing compared to the outboard bearing.
Various stud patterns are available to suit most common rims and blank hubs (undrilled) are also available. Hubs are also available either in bare steel, painted, zinc plated and galvanised and for most applications either zinc plated or galvanised are recommended.
When purchasing hubs and stubs, get the correct load rating for your requirements, it would be false economy to upgrade to heavier hubs as this can affect the setup of your axle and end up costing more money in the long run.
The best place to spend extra money is on good quality branded bearings and marine seals. Stay away from unbranded bearings and if they are included in a hub and stub kit, ask for an upgrade – you will not be sorry.
It is also possible to buy unbraked hubs with the provision for bolting on a braking rotor in the future. If you do go for this option, get the correct stub axle with the caliper yoke already fitted as this will save time and money when you do upgrade to brakes.
Stub axles in the 1500kg load capacity are normally welded into 40nb medium steel pipe or 50 x 50 x 4.0/5.0 SHS and require accurate setup and strong welding to ensure true running wheels. It is advised to get your axles welded professionally.
Stub Axles in the 1750kg to 2500kg load capacity range are normally welded into a 65 x 65 x 6.0mm SHS or larger for straight axles and into a suitable axle dropper if the axle is to be stepped. Again it is always advisable to get your axles professionally manufactured.
BRAKING HUBS AND STUBS
(including brake components)
Hydraulic Disc Brake Hubs and Stubs
The design for hydraulic disc brake hubs and stubs is similar to that of the non-braking version with the inclusion of a rotor on the hub and a caliper yoke on the stub axle.
NOTE – When purchasing always make sure that the stub axle is matched to the rotor and caliper setup as the yoke design is normally caliper/rotor specific.
The load rating for these hubs ranges from 1500kg to 2500kg and have larger bearing arrangements and larger rotors as the load capacity increases. Caliper sizes normally remain the same across the range although on the heavier duty models there is sometimes the option of a double yoke axle for fitting an additional caliper. (You will need to upgrade to a larger master cylinder reservoir on your coupling.if more than one set of calipers are used)
NOTE - It always pays to take your wheel rim along to the supplier and do a dry setup of the hub/rotor and caliper before purchasing, to make sure that there is sufficient clearance within the rim.
Different suppliers will offer choices of fully cast one piece rotor and hub which are reasonably cheap to purchase and they have the advantage of being robust, have some cooling capacity due to an air gap between the rotor and the bearing enclosure and being readily available. The rotor can be machined if it gets damaged, pitted or scoured although your trailer will be off the road while this is being done.
More commonly available now are bolt on rotors which are a little more dearer to purchase but have quite a few advantages.
Depending on the brand, vented rotors (to assist in keeping the rotor/calipers and hubs cool) are available and rotors also come in various materials from cast iron, stainless steel and bronze. The latter two rotor materials are more suitable for marine applications such as boat trailers.
If the rotors are damaged or scoured, they are easily replaced or removed for machining.
Ideally the best braking comes from bigger rotors and the appropriate caliper piston to force it against the rotor. Calipers come in many options with single or multiple piston arrangements, cast iron, alloy or stainless bodies, differing piston materials from phenolic compounds, brass, or stainless and even the option of fitting a manual handbrake system to the calipers. Just make sure that the caliper, rotor and axle yoke are all compatible.
Various stud patterns are available to suit most common rims and blank hubs (undrilled) are also available. Hubs are also available either in bare steel, painted, zinc plated and galvanised and for most applications either zinc plated or galvanised are recommended.
Hydraulic disc brakes are one of the most dependable braking systems available, and are simple to maintain and repair as long as they are looked after and treated with a little care.
When hydraulic pressure is applied via an override coupling with a master cylinder, small piston(s) force the brake pads against the braking rotor and through friction cause the trailer to slow or stop.
Disc brake hubs and stubs range between 1500kg load capacity to 2500kg although larger and heavier models are available, they are unsuitable – both legally and practically, for most on-road trailer purposes.
Personally I think a good quality cast iron bolt on rotor – vented or non-vented, with a cast iron caliper setup with stainless steel pistons is most economical way to fit brakes to your trailer. On a boat trailer that will not see a lot of maintenance, or if the brake units are inaccessible for cleaning, full stainless rotors and calipers would be recommended.
With a 2500kg GVM tandem axle trailer it is only necessary to fit brakes to one axle although fitting brakes to both axles will give you greater and more precise braking power overall, it will not increase the load capacity of the trailer.
Mechanical Disc Brake Hubs and Stubs
The principle behind mechanical disc braking is similar to hydraulic disc brakes but instead of hydraulic fluid operating the brakes, cables do the work. Hubs/rotors and stub axles are the same but the hydraulic caliper is replaced with a forward pull mechanical caliper.
On the override coupling the hydraulic master cylinder is replaced with a simple lever arrangement which is attached via steel cables to the calipers. When the tow vehicle brakes, the coupling will move the lever, pulling the cables and operating the calipers.
This type of braking is really at its most basic and is the cheapest form of braking available but does come with a few shortcomings.
Any stretch in the cables and fittings (including brake pad wear) not taken out on a regular basis and correctly adjusted will reduce the braking capacity of the trailer to the point where it may become non-existent. Because the cables need to have an almost straight line track to the calipers, they tend to be out in the open and inclined to get caught up in debris or damaged more often than not.
When towing a full load on your trailer, your suspension will be working overtime and your hubs will be regularly moving up and down and also in whichever direction your suspension is set to do. In turn this will cause your cable to either slacken or go tight and can interfere with safe braking when required.
The rating for mechanical disc brakes is up to 2000kg but I would be cautious about towing anything at the upper limit unless the cables are correctly adjusted.
Mechanical disc brakes are a reasonable stand in if you are not able to afford the hydraulic brake option but have plans on upgrading in the future as the majority of the components are already in place.
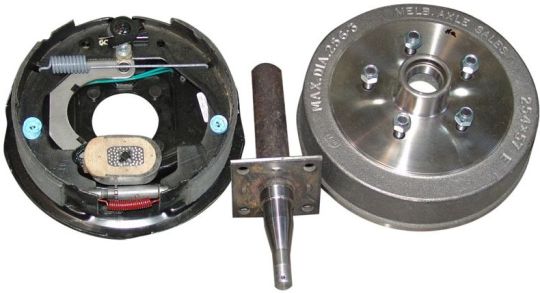
Drum Brakes
Drum brakes consist of a backing plate which is bolted onto a fixed plate on the stub axle and contains the brake shoes and lever/spring setup to activate the shoes against the outer drum. The drum itself is a heavy casting which provides the friction surface for the brake shoes and contains the bearings and seals as well as the wheel studs for mounting onto the rim.
Drum brakes have a characteristic of self energizing, where, during normal operation, the rotation of the drum can drag either of the brakes shoes onto the friction surface of the drum. This causes the brakes to bite harder and increases the force holding them together. The stopping power of the trailer is slightly increased. The characteristic of self energizing also makes the drum brakes more susceptible to “brake fade” which is a reduction in brake friction under heavy braking. Under normal conditions this would not be an issue, but if towing heavy loads down steep inclines or where sustained braking is needed, high temperatures within the drum will cause the brakes to “soften” and become less reliable.
Once cool, the brakes will return to their normal state, but it would pay to remove the drum and check the condition of the brake shoes. If any glazing has occurred, use a fine grit emery cloth to sand the shoes gently and replace the pads if they showing signs of wear or damage.
Drum brakes also have another drawback which is quite the opposite to “brake fade” and that is when the brakes are cold and damp or if there is any rust forming on the drum. In these circumstances, the brake shoes can “grab” onto the drum and can cause the wheels to skid even when no brake pressure is applied.
The situation may resolve itself quickly depending on the weight of the trailer and the road surface, or, due to the self energizing characteristic of the shoes, may intensify the problem to the point where you need to get your hands grubby pulling the unit apart and remedying the situation.
However, drum brakes are still the brake of choice for many trailers, especially electrically operated units on trailers over the 2500kg load rating.
Drum brakes, due the way the shoes have contact with the circumference of the drum can normally provide more braking force than the same diameter disc brake. The disadvantage is that drum brakes retain heat and are more complicated to setup and maintain than disc brakes, but are often cheaper to purchase and are normally more powerful than their counterparts.
The key to using drum brakes is to ensure that they are setup exactly to the manufacturer’s recommendations and that you check and maintain them on a regular basis, especially if they are operating close to or at their rated limits.
Mechanical Drum Brake Hubs and Stubs
Mechanical drum brakes have a lever which protrudes through the backing plate and is connected via cables to the override coupling. The lever is forward pull operated and when purchasing your drum brakes, make sure you get a “Left” and “Right” unit and fit them on the appropriate side.
The brakes work on the same principle as the mechanical disc brake apart from the way the brake shoes operate on a rotary surface rather than the pads on a vertical surface of a rotor.
The load rating for Mechanical drum brakes is between 1250kg to 2000kg, depending on the drum size, and normally has the advantage of self adjusters for any wear incurred on the brake shoes.
Similar problems occur on this setup as per the mechanical disc brakes although overall tend to be more reliable.
Hydraulic Drum Brake Hubs and Stubs
Hydraulic Drum brakes are very similar to the Mechanical drum brakes apart from using a hydraulic cylinder to operate the brakes shoes via a hydraulic override coupling instead of a cable.
Depending on the size of the drum, load ratings are up to 2000kg although 1750kg load rating is common.
This type of braking is more positive and proportional to the cable system and gives smoother, more reliable braking and is especially suited to trailers where cartage of livestock or delicate loads is regularly undertaken.
Electric Drum Brake Hubs and Stubs
Electrically operated drum brakes are the most common type of drum brakes on light trailers up to 3500kg load capacity.
The advantage of electrically operated drum brakes is that because the input from the controller is precise, the amount of control over the trailer is enhanced whether the trailer is empty or full and gives exceptionally smooth and proportional braking.
Most electric drum brakes have the option of a mechanical lever park brake within the units.
Again, correct setup and regular maintenance is paramount to ensure reliable and trouble free operation.
Drum Brake Basic Setup Procedure
- Place the backing plate over the axle and tighten the bolts until they are finger tight.
- Grease the bearings and fit them and the seal to the drum.
- Slide the drum assembly over the axle until it sets correctly - watch your fingers don’t get jammed between the drum and backing plate!
- Tighten up the castle nut until there is no play in the bearings and then back the castle nut off slightly.
- Adjust the brake adjusters on the backing plate until the brake shoes lock onto the drum .
- Tighten the backing plate bolts onto the axle. The backing plate should now be central on the axle.
- Back off the brake adjuster until the drum turns freely without any noticeable drag
- Re-seat the bearings once again by tightening and backing off the castle nut while slowly turning the drum. Loosen the castle nut just enough so that the hole in the axle and castle nut groove are aligned and fit the split pin.
- Fold over split pin so that is it fixed in position and fit the dust cap.
- Check and re-adjust the bearings after the first 500kms.