RV Trailer Axle Flipping - Part 3
Continued on from Axle Flipping Part 2
Brake Wiring -
For the electric brake wiring, cut an adequate length of spare cable to fit between the two cut ends with a couple of inches to spare for slack and movement in the suspension. Strip the plastic sheathing back to allow either soldering the wires together (slide on some heat shrink tubing if soldering) or for fitting crimp bullet/spade connectors.
Match the brake wiring up as they were marked prior to cutting, and when wired up, check that the brakes activate with the help of a friend. Once the wheel is fitted to the braking hub, spin the wheel while your friend activates the breakaway braking pin. If the wheel instantly locks up, power is being correctly applied to the brakes.
Shock Absorbers -
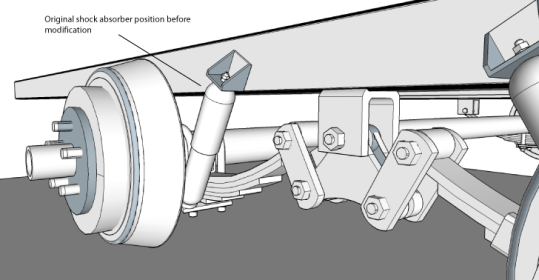
If your trailer spring setup is fitted with shock absorbers, additional modifications will need to be done to remount the shock absorber once the axles have been “flipped”.
Remove the shock absorber when disconnecting the spring from the axle. Measure up your shock absorber mounts and source new mounts from your local trailer hardware supplier.
Under no circumstances, should you attempt to remove the existing mount and reposition it. Doing so could compromise the strength of the chassis and potentially reduce the trailers integrity and lifespan.
When you order the over/under conversion kit for the axle flip, check that the new spring plates have provision for attaching the bottom end of the shock absorber
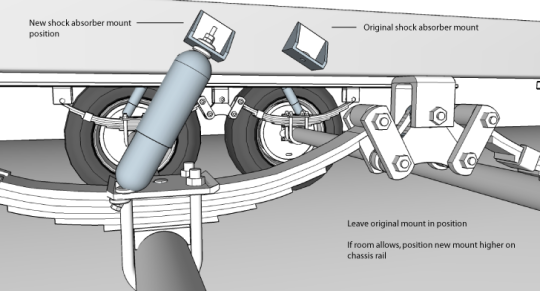
Once the axle has been “flipped”, locate the shock absorber bottom end into the spring plate and position the shock and top mount so they are in approximately the same angle as the original setup.
The shock absorber will need to be compressed to compensate for the reduced travel.
If room is available, raise the new mount higher on the chassis rail to give additional cushioning from the shock absorber.
The angle of the shock absorber is not overly critical as long as it is not truly vertical or at an angle more than 30 degrees from the vertical. The shock absorber should always angle toward the direction of spring/axle travel (in the above example – up and to the right).
When happy with the positioning, clamp the mount, remove the shock absorber (to prevent any fire or potential explosion) and weld the mount to the chassis.
Getting back on the road –
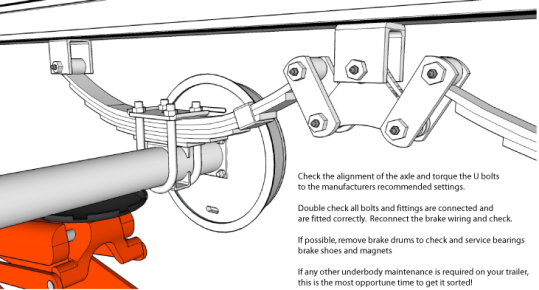
If time allows, remove the drums and do some servicing on the brakes and wheel bearings.
Refit the wheels, lower the trailer to the ground, hitch up and take the trailer for a good run. Take it slowly at first – the trailer will handle slightly differently after the modifications and it will take some time to get a feel for how it rides.
After a good 100 or so miles, get back under your trailer and recheck the torque settings for all the spring and equalizer bolts, U bolts and wheel lug nuts.
Happy trailering!
Note - first published at https://www.doityourselfrv.com/axle-flipping-guide-flip-axles-trailer-ground-clearance-better-boondocking/ - 2014